@simplewebauthn/browser
Current version
The content below should be accurate for @simplewebauthn/browser@^13.0.0. Please open an issue here to report any inaccuracies.
Installation
This package can be installed from NPM and JSR:
Node LTS 20.x and higher
npm install @simplewebauthn/browser
Deno v1.43 and higher
deno add jsr:@simplewebauthn/browser
UMD
This package can also be installed via unpkg by including the following script in your page's
<head> element. The library's methods will be available on the global SimpleWebAuthnBrowser
object.
The only difference between the two packages below is that the ES5 bundle includes some polyfills for older browsers. This adds some bundle size overhead, but does enable use of browserSupportsWebAuthn() in older browsers to show appropriate UI when WebAuthn is unavailable.
If you are using a UMD bundle in production, it is highly recommend that you...
- Visit the URL in either
<script>tag below to get the exact-version URL that it redirects you to. - Enter that versioned URL into the SRI Hash Generator to create a version of that script tag that includes a subresource integrity checksum, to ensure you are always getting the exact, unmodified version of that file that you requested.
ES2021
If you only need to support modern browsers, include the ES2021 version:
<script src="https://unpkg.com/@simplewebauthn/browser/dist/bundle/index.umd.min.js"></script>
ES5
If you need to support WebAuthn feature detection in deprecated browsers like IE11 and Edge Legacy,
include the ES5 version:
<script src="https://unpkg.com/@simplewebauthn/browser/dist/bundle/index.es5.umd.min.js"></script>
Types
This package exports almost all of its types for TypeScript projects to import. For example:
import type { WebAuthnCredential } from '@simplewebauthn/browser';
import { ..., type WebAuthnCredential } from '@simplewebauthn/browser';
See the auto-generated API docs for this project on JSR for a comprehensive list of available imports.
Methods
The following methods are exported from @simplewebauthn/browser:
startRegistration()
"Registration" is analogous to new account creation. The front end uses the following methods from this package to accomplish this:
import { startRegistration } from '@simplewebauthn/browser';
The front end's primary job during registration is the following:
- Get registration options from the Relying Party (your server)
- Submit registration options to the authenticator
- Submit the authenticator's response to the Relying Party for verification
Below is all of the front end JavaScript needed to fulfill these three steps using this package:
The code below is a basic implementation written in plain JavaScript for placement in a plain HTML document. @simplewebauthn/browser is installed following the "UMD" installation method mentioned above.
That said, this general sequence of events should be easily adaptable to the front end framework of your choice (React/VueJS/Svelte/etc...) for use in projects that follow the above npm install installation method.
<script>
const { startRegistration } = SimpleWebAuthnBrowser;
// <button>
const elemBegin = document.getElementById('btnBegin');
// <span>/<p>/etc...
const elemSuccess = document.getElementById('success');
// <span>/<p>/etc...
const elemError = document.getElementById('error');
// Start registration when the user clicks a button
elemBegin.addEventListener('click', async () => {
// Reset success/error messages
elemSuccess.innerHTML = '';
elemError.innerHTML = '';
// GET registration options from the endpoint that calls
// @simplewebauthn/server -> generateRegistrationOptions()
const resp = await fetch('/generate-registration-options');
const optionsJSON = await resp.json();
let attResp;
try {
// Pass the options to the authenticator and wait for a response
attResp = await startRegistration({ optionsJSON });
} catch (error) {
// Some basic error handling
if (error.name === 'InvalidStateError') {
elemError.innerText = 'Error: Authenticator was probably already registered by user';
} else {
elemError.innerText = error;
}
throw error;
}
// POST the response to the endpoint that calls
// @simplewebauthn/server -> verifyRegistrationResponse()
const verificationResp = await fetch('/verify-registration', {
method: 'POST',
headers: {
'Content-Type': 'application/json',
},
body: JSON.stringify(attResp),
});
// Wait for the results of verification
const verificationJSON = await verificationResp.json();
// Show UI appropriate for the `verified` status
if (verificationJSON && verificationJSON.verified) {
elemSuccess.innerHTML = 'Success!';
} else {
elemError.innerHTML = `
`;
}
});
</script>
Auto Register (Conditional Create)
In supported browsers, calling startRegistration({ ..., useAutoRegister: true }) after a successful non-passkey authentication can trigger the silent creation of a passkey. If the password manager that was just used for password autofill is also a passkey provider then the browser will attempt to work with it to register a passkey without any modal UI shown to the user:
<!-- completedPasswordLogin.html -->
<body>
  <!-- Typical landing page the user ends up on after login goes here -->

  <script>
    const { startRegistration } = SimpleWebAuthnBrowser;

    /**
     * Get options then call `startRegistration()`. Errors should be ignored
     * as auto upgrade is considered "opportunistic" and can fail more easily
     * than other such WebAuthn calls if the browser is not satisfied that all
     * requirements have been met.
     */
    fetch('/generate-registration-options')
      .then(resp => resp.json())
      .then((optionsJSON) => {
        // Note the `useAutoRegister: true` argument here
        startRegistration({ optionsJSON, useAutoRegister: true })
          .then(regResp => sendToServerForVerification)
          .catch(err => handleError);
      });
  </script>
</body>
If successful, startRegistration({ ..., useAutoRegister: true }) will resolve with a typical registration response.
The up (User Presence) bit in this response is likely to be false! Be sure to specify requireUserPresence: false when passing this response into @simplewebauthn/server's verifyRegistrationResponse() to account for this.
Successful use of Auto Register can be considered "upgrading" a user to be able to use their new passkey for subsequent authentications.
startAuthentication()
"Authentication" is analogous to existing account login. Authentication in the front end uses the following methods from this package:
import { startAuthentication } from '@simplewebauthn/browser';
The front end's primary job during authentication is the following:
- Get authentication options from the Relying Party (your server)
- Submit authentication options to the authenticator
- Submit the authenticator's response to the Relying Party for verification
Below is all of the front end JavaScript that is needed to fulfill these three steps using this package:
The code below is a basic implementation written in plain JavaScript for placement in a plain HTML document. @simplewebauthn/browser is installed following the "UMD" installation method mentioned above.
That said, this general sequence of events should be easily adaptable to the front end framework of your choice (React/VueJS/Svelte/etc...) for use in projects that follow the above "npm" installation method.
<script>
const { startAuthentication } = SimpleWebAuthnBrowser;
// <button>
const elemBegin = document.getElementById('btnBegin');
// <span>/<p>/etc...
const elemSuccess = document.getElementById('success');
// <span>/<p>/etc...
const elemError = document.getElementById('error');
// Start authentication when the user clicks a button
elemBegin.addEventListener('click', async () => {
// Reset success/error messages
elemSuccess.innerHTML = '';
elemError.innerHTML = '';
// GET authentication options from the endpoint that calls
// @simplewebauthn/server -> generateAuthenticationOptions()
const resp = await fetch('/generate-authentication-options');
const optionsJSON = await resp.json();
let asseResp;
try {
// Pass the options to the authenticator and wait for a response
asseResp = await startAuthentication({ optionsJSON });
} catch (error) {
// Some basic error handling
elemError.innerText = error;
throw error;
}
// POST the response to the endpoint that calls
// @simplewebauthn/server -> verifyAuthenticationResponse()
const verificationResp = await fetch('/verify-authentication', {
method: 'POST',
headers: {
'Content-Type': 'application/json',
},
body: JSON.stringify(asseResp),
});
// Wait for the results of verification
const verificationJSON = await verificationResp.json();
// Show UI appropriate for the `verified` status
if (verificationJSON && verificationJSON.verified) {
elemSuccess.innerHTML = 'Success!';
} else {
elemError.innerHTML = `
`;
}
});
</script>
Browser Autofill (Conditional UI)
Calling startAuthentication({ ..., useBrowserAutofill: true }) will set up support for credential selection via the browser's native autofill popup:
<head>
  <!-- ... -->
  <script>
    const { startAuthentication } = SimpleWebAuthnBrowser;

    fetch('/generate-authentication-options')
      .then(resp => resp.json())
      .then((optionsJSON) => {
        // Note the `useBrowserAutofill: true` argument here
        startAuthentication({ optionsJSON, useBrowserAutofill: true })
          .then(authResp => sendToServerForVerificationAndLogin)
          .catch(err => handleError);
      });
  </script>
</head>
<body>
  <!-- ... -->
  <label for="username">Username</label>
  <input type="text" name="username" autocomplete="webauthn">
The "webauthn" value in the autocomplete attribute is required for autofill to work. startAuthentication() will error out if an <input> with this autocomplete value cannot be found on the page.
"webauthn" can be combined with other typical autocomplete values, including "username" and "current-password", but must appear at the end to consistently trigger conditional UI across browsers. The following are all valid:
autocomplete="webauthn"
autocomplete="username webauthn"
autocomplete="current-password webauthn"
If you absolutely know that a suitable <input> element as described above exists somewhere in the DOM (e.g. inside a web component's shadow DOM), but startAuthentication() raises an error that such an element cannot be found, then you can also specify verifyBrowserAutofillInput: false when calling this method to bypass the error:
startAuthentication({
  optionsJSON,
  useBrowserAutofill: true,
  verifyBrowserAutofillInput: false,
})
  .then(...)
Guidance from platform vendors indicates that it is important to initialize WebAuthn's Conditional UI experience as soon as possible. Placing this logic in <head> should give browsers enough time to query authenticators for any discoverable credentials to display to the user. It may also work to delay painting UI For N milliseconds to achieve the same thing in something like a single-page app that would trigger this experience some time after page load. It's still early days for this capability, though, and different browsers may have different quirks while the feature evolves.
This new "pending" WebAuthn request will be automatically cancelled on a subsequent execution of startAuthentication() in, for example, a click handler that triggers the browser's typical "modal" WebAuthn experience.
Conditional UI is still a nascent capability, but this method should be pretty reliable since the API is largely settled. This new logic has been successfully tested in both Chrome Canary v103 and Safari 16.0 in the macOS Ventura beta.
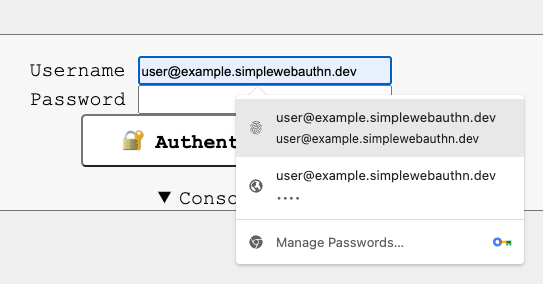
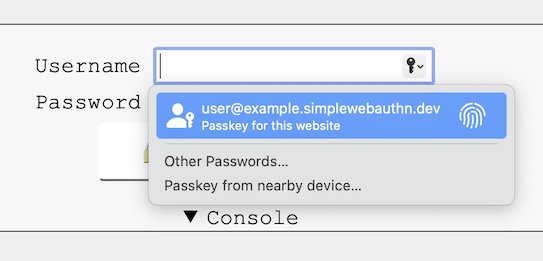
When supported, users can quickly authenticate by selecting a credential when interacting with the <input>:
Chrome Canary v103:
Safari 16.0:
The selection of a credential from this popup will resolve the Promise returned by startAuthentication(), at which point the response can be submitted to the server for verification like usual. If verification succeeds, then the user can be logged in.
browserSupportsWebAuthn()
This helper method is included in this package to help preemptively check for the browser's ability to make WebAuthn API calls:
import { browserSupportsWebAuthn } from '@simplewebauthn/browser';
startRegistration() and startAuthentication() both call this method internally. In some scenarios, though, it may be more desirable to hide UI when the page loads and a call to browserSupportsWebAuthn() returns false:
<script>
  const elemBegin = document.getElementById('btnBegin');
  const elemSuccess = document.getElementById('success');
  const elemError = document.getElementById('error');

  const { browserSupportsWebAuthn } = SimpleWebAuthnBrowser;

  if (!browserSupportsWebAuthn()) {
    elemBegin.style.display = 'none';
    elemError.innerText = 'It seems this browser does not support WebAuthn...';
    return;
  }

  // ...snip...
</script>
browserSupportsWebAuthnAutofill()
This helper method checks for a browser's support for "Conditional UI". When this feature is present, the browser is capable of presenting a list of the user's discoverable credentials in the browser's native autofill prompt.
import { browserSupportsWebAuthnAutofill } from '@simplewebauthn/browser';
This method is automatically called by startAuthentication() when true is passed as a second argument, but it may still be independently useful in, for example, single-page applications that may seek to initiate authentication after page load.
platformAuthenticatorIsAvailable()
"Platform authenticators" are known by most users by their brand names: Touch ID, Face ID, Windows Hello...this asynchronous method helps you identify opportunities in which these types of authenticators can be used by your users:
import { platformAuthenticatorIsAvailable } from '@simplewebauthn/browser';
These advanced types of authenticators are typically embedded into a user's computer or phone and offer quick confirmation of a user's identity via biometric scan or PIN fallback. As a result of their convenience, you may wish to prioritize user registration of such authenticators when one is available for use:
<script>
  const { platformAuthenticatorIsAvailable } = SimpleWebAuthnBrowser;

  (async () => {
    if (await platformAuthenticatorIsAvailable()) {
      /**
       * Prompt the user to use Touch ID/Windows Hello/etc... or security keys to register or
       * authenticate
       *
       * How to decide which name to show for the device's platform authenticator is an exercise
       * left up to the developer (your best bet is User Agent analysis)
       */
    } else {
      /**
       * Only prompt the user to use security keys to register or authenticate
       */
    }
  })();
</script>
Helpers
Below are various methods and classes intended to help Relying Parties work with this library. These methods are not typically needed when using this library, but they have been made available nonetheless for those projects that may need it.
base64URLStringToBuffer()
This method helps convert a base64url-encoded string into a Uint8Array:
import { base64URLStringToBuffer } from '@simplewebauthn/browser';

const valueBytes: ArrayBuffer = base64URLStringToBuffer('...');
bufferToBase64URLString()
This method helps convert a Uint8Array into a base64url-encoded string:
import { bufferToBase64URLString } from '@simplewebauthn/browser';

const valueBase64URL: string = bufferToBase64URLString(new Uint8Array(...));
WebAuthnAbortService
startRegistration() and startAuthentication() coordinate cancellation of existing WebAuthn
calls via an internal WebAuthnAbortService class singleton. Whenever either of these methods is
called, any preceding call to WebAuthn triggered by this library is automatically cancelled to
avoid issues with browsers that may object to a page attempting to make multiple, simultaneous
calls to WebAuthn.
However, this singleton has been exposed as a helper to enable certain types of projects, like Single-Page Applications (SPA), to manually trigger cancellation of a pending WebAuthn request as needed (e.g. client-side routing away from a login page needs to cancel any pending WebAuthn calls):
import {
  startAuthentication,
  WebAuthnAbortService,
  WebAuthnError,
} from '@simplewebauthn/browser';

// On mount, the component triggers conditional UI
useEffect(() => {
  try {
    const response = await startAuthentication({ ..., useBrowserAutofill: true });
  } catch (err) {
    if (err instanceof WebAuthnError && err.code === 'ERROR_CEREMONY_ABORTED') {
      // Error can safely be ignored
    } else {
      // Something else went wrong
    }
  }
}, []);

function handleLeavePage() {
  // Cancel the pending WebAuthn request before leaving the login page
  WebAuthnAbortService.cancelCeremony();
}
WebAuthnError
The WebAuthnError class is used to wrap errors that are raised when calling WebAuthn via
startRegistration() and startAuthentication(). Projects can import this error to perform
instanceof checks when catching errors to discern SimpleWebAuthn library errors from other errors
that may arise.
An instance of this error has the same name property as the WebAuthn error it is wrapping, but
has a custom message property that tries to better communicate what may have caused the error.
A corresponding code property is also set on it to programmatically work with library-identified
error causes.
Finally, the cause (MDN)
property is set to the original Error raised by the call to navigator.credentials.create()
or navigator.credentials.get() so that Relying Party developers can directly access the raw
WebAuthn error.
import { startRegistration, WebAuthnError } from '@simplewebauthn/browser';

try {
  const response = await startRegistration({ ... });
} catch (err) {
  if (err instanceof WebAuthnError) {
    // See `name`, `message`, `code`, and `cause` for more info
  } else {
    // Something else went wrong
  }
}
Troubleshooting
startRegistration() unexpectedly errors out with NotAllowedError after scanning QR code
When a call to startRegistration() results in scanning a QR code with a mobile device, scanning the QR code displayed in Google Chrome may result in a NotAllowedError in the browser and an unexpected error on the mobile device:
NotAllowedError: The operation either timed out or was not allowed. See: https://www.w3.org/TR/webauthn-2/#sctn-privacy-considerations-client.
    at new r (index.es5.umd.min.js:2:3304)
    at index.es5.umd.min.js:2:8932
    at index.es5.umd.min.js:2:10161
    at index.es5.umd.min.js:2:1934
    at Object.throw (index.es5.umd.min.js:2:2039)
    at s (index.es5.umd.min.js:2:808)
Caused by: DOMException: The operation either timed out or was not allowed. See: https://www.w3.org/TR/webauthn-2/#sctn-privacy-considerations-client.
This can be caused by an empty value string value (i.e. "") for user.displayName in the options passed to startRegistration().
To fix this, set user.displayName to the same value as user.name and try again. If you are using @simplewebauthn/servers's generateRegistrationOptions() method then you can set the userDisplayName argument to the same value as the userName argument to achieve the same result.
This is confirmed Chrome-specific bug that affects Chrome up through 127. A bug report for this issue has been logged as https://issues.chromium.org/issues/346835891. These docs will be updated when this issue is resolved and a new version of Chrome improves this behavior.
TypeError: Cannot read properties of undefined (reading 'challenge')
As of SimpleWebAuthn v11.0.0 both the startRegistration() and startAuthentication() accept a single object argument, with various options specified as properties in that argument. If you see this error, or were otherwise directed here after calling either of these methods, it is likely caused by passing in options directly (the old way), without wrapping them in an object and specifying them as optionsJSON as expected.
To fix this, update method calls to pass in options within an object instead:
// Before
const response = await startRegistration(options, ...);

// After
const response = await startRegistration({ optionsJSON: options, ... });
// Before
const response = await startAuthentication(options, ...);

// After
const response = await startAuthentication({ optionsJSON: options, ... });